Johanna Jarvinen: Digitalisering og bærekraft går hånd i hånd
Bærekraft møter teknologi: Les hvordan Symetri bidrar til grønnere byggeprosesser med datadrevne løsninger.


Never rely on one set of Analysis Results!
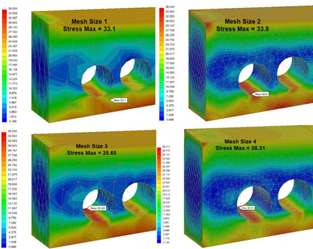
The only exception to this is displacements results. However, in most cases we are usually interested in stress results which are required to calculate the factor of safety of our designs. When analysing results, we need to make sure the stress value is not affected by changing the mesh size. I usually get asked a lot on "What element size should I use to get an accurate result?" In response to the question I usually say, "I honestly dont know" but I also say, "Analyse your results 3 times with a different mesh size in each analysis". This is more formally known as manual mesh convergence (sometimes also referred as mesh sensitivity study).
Below is my suggested workflow*.
 Step 1 - Analyse with default mesh size.
Step 2 - Analyse again by reducing the mesh element size by half.
Step 3 - Analyse again by further reducing the Step 2 mesh size by half.
Sometimes you may need to run an analysis a fourth time in the case when stress comparison is either very close to 10% or above it. If this is the case I suggest you use local mesh control at the area of high interest rather than changing the global mesh size. This will help to reduce the file size in addition to quicker run times.
However, in some cases the stress value will keep on rising as you make the mesh finer. This phenomenon is referred to as stress singularities (or hotspots) which leads to my next section on stress singularities and how to avoid them.
If you would to watch some of the videos I have created around Autodesk Simulation then please take a look at our Simulation webinar library.
* Some software's have the ability to run a mesh sensitivity study.
Bærekraft møter teknologi: Les hvordan Symetri bidrar til grønnere byggeprosesser med datadrevne løsninger.
Nullenergibygg reduserer CO₂-utslipp fra bygg og møter økende krav fra markedet. Lær hvorfor de er viktige for en bærekraftig fremtid.
LCA vurderer CO₂-avtrykk og andre miljøpåvirkninger gjennom hele byggets livsløp. I denne bloggen gir vi deg tre praktiske eksempler på hvordan ulike aktører i byggebransjen kan bruke LCA aktivt for å ta mer bærekraftige beslutninger.
